The methods mentioned in this article can be used to make fades and blends in Flipnote Studio.
General Information[]
Use smooth fades to connect scenes or visualize a bigger time gap. Depending on your Flipnote speed you have to use more or less pages to create a smooth blend or fade. If you are unsure, you can calculate the length of the fade or blend with this formula:

You find the FPS values in the Flipnote speed article.
Theory[]
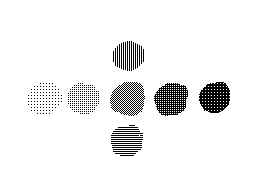
The different patterns represent different brightness levels (gray colors). To create a fading we just use this pattern to add or remove a level of brightness to the page. If we do this in a sequence, and increase or decrease the brightness for every page, an optical fading effect is created.
The same technique can be used with different colors, and on single objects. You can also blend two colors or a color into white or black.
Simple Pattern Fading[]
- Make a number of copies of the page you like to fade out. The number of copies depends on the speed of your Flipnote. See my note at the begin of the article about this.
- Use now the eraser with the lightest pattern on the first page.
- Use the next darker pattern on the next page.
- Continue until you have an empty page or the object isn't visible anymore. Depending on the number of pages you have, you may have to skip some patterns or use the same pattern on multiple pages.

If you like to fade to the drawing color (e.g. black), just draw with the pattern over the image instead of erasing the pattern from it.

Pixel Fading[]
- Make a number of copies of the page you like to fade out. The number of copies depends on the speed of your Flipnote. See my note at the begin of the article about this.
- Now use Shrink and Enlarge an increasing number of times. Start with once Shrink, then once Enlarge. On the next time use two times Shrink, then two times Enlarge.
- Continue until only few large pixels are on the page.

You can improve the effect by adding a simple pattern shading to the pixel fading.

Line Shift Fading[]
Preparation[]
- Insert a number of empty result pages. The number of copies depends on the speed of your Flipnote. See my note at the begin of the article about this.
- Copy the object you like to fade on two additional pages. I will call this copies A and B.
- Use the eraser with the vertical line pattern on copy A.
- Go to the copy B, and move the whole page one pixel to the left.
- Use now the eraser with the vertical line pattern on copy B too.
- Move the copy B page one pixel to the right, back into the original position.
Create Fade[]
- Move copy A one pixel up, and copy B one pixel down.
- Copy the "copy A" page to the first result page.
- Copy the "copy B" page, and merge it with the first result page.
- Move now copy A two pixel up, and copy B two pixel down.
- Repeat this until you filled all your result pages.

Again to improve this fading effect, add a simple pattern fading to it.

Blending[]
To create a blending between two scenes, just let some pages of the fade-out and the fade-in overlap. So prepare a simple fade-out and a simple fade-in and then merge e.g. the last 3 pages of the fade-out with the first 3 pages of the fade-in.
You should move the fade-out or fade-in pattern pages 2 pixel left and down to avoid that the patterns overlap. Just try out how you get the best results.
